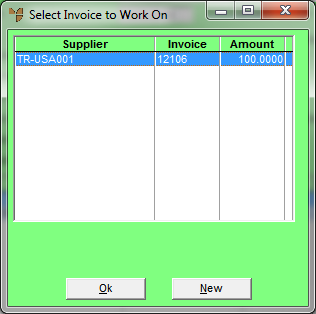
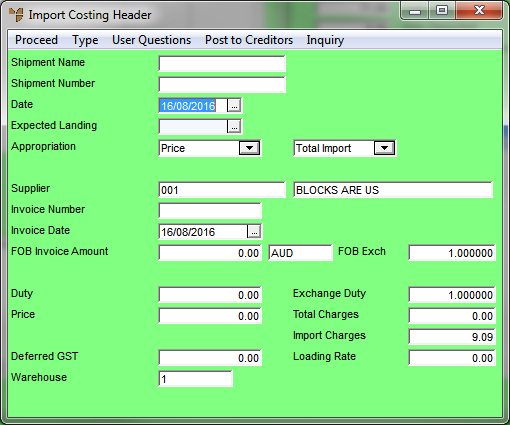
You are here: 1. Distribution System > 1.5. INVENTORY Menu: Purchasing and Stock Control > 1.5.10. Inventory - Import Costing > 1.5.10.7. Import Costing - Menu Options > Import Costing - Change Invoice
Import Costing - Change Invoice

A costed shipment may be delivered with one or more supplier invoices, e.g. there may be separate invoices from different suppliers or for different goods received in the shipment.

Use this option if there is more than one supplier invoice for a shipment. It allows you to select the invoice to be reconciled against the goods received, and/or to enter the details of a new supplier invoice. This creates a new Import Costing Header screen where you enter the invoice details, and displays the items for each invoice separately on the Import Costing screen.


Technical Tip

If there is only one invoice for a shipment, you simply enter the invoice details on the default Import Costing Header screen – see "Maintaining the Import Costing Header", and maintain all the invoice items together on the Import Costing screen – see "Entering Import Cost Lines".

To select/create the invoice you want to work on:

  1. Display the Import Costing screen.

Refer to "Import Costing - Menu Options".

  1. Select CHANGE INVOICE.

Micronet displays the Select Invoice to Work On screen showing the default invoice created for the shipment. You should have entered the details of the first invoice already – see "Maintaining the Import Costing Header".

  1. To create subsequent invoices for the shipment, select the New button.

Micronet displays the Import Costing Header screen.

  1. Enter the invoice details as normal.

Refer to "Maintaining the Import Costing Header".

  1. When you have finished entering the invoice details, select PROCEED or press F2.

Micronet displays the Dissect Import Cost screen.

  1. Post the invoice amounts to the correct accounts in the General Ledger.

Refer to "Dissecting an Import Costing Batch".

Micronet redisplays the Import Costing screen.

  1. Add or maintain the items on the invoice.

Refer to "Entering Import Cost Lines".

  1. Repeat the steps above to add further invoices for this shipment if required.


Technical Tip

Once you have created an invoice, you use the CHANGE INVOICE option to switch between the different invoices. On the Select Invoice to Work on screen, select the invoice number you want to work on then select Ok. Micronet displays all item lines for the selected invoice on the Import Costing screen. You can: